Agents
Create and configure specialized AI agents to automate tasks, analyze data, and streamline your workflows
Introduction
Agents in IdeaboxAI are specialized AI entities that perform specific tasks like data analysis, summarization, or workflow automation. You can configure agents with custom instructions, knowledge bases, and external tools to build tailored solutions for your business operations.
Getting started
Access the agents dashboard
Navigate to Agents in the sidebar to view your workspace's agent dashboard. Here you'll find:
- A searchable table of all existing agents
- Agent metadata including name, visibility, creator, and last modified date
- The + Create Agent button to start building a new agent
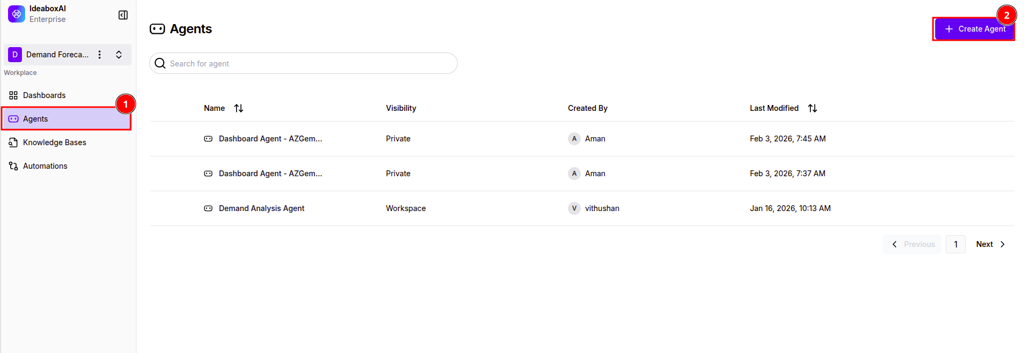
💡 Tip: Set sensitive agents to Private visibility during development and testing. Switch to workspace-wide visibility only when the agent is production-ready.
Creating an agent
Configure the general profile
When you click + Create Agent, you'll start in the General tab. Here's what to configure:
- Avatar - Choose a visual identifier for your agent
- Name (required) - Give your agent a unique, descriptive name
- Description - Explain what your agent does and when to use it
- Tags - Add keywords to make your agent easier to discover
- Visibility - Choose between Private (only you) or Workspace (team access)
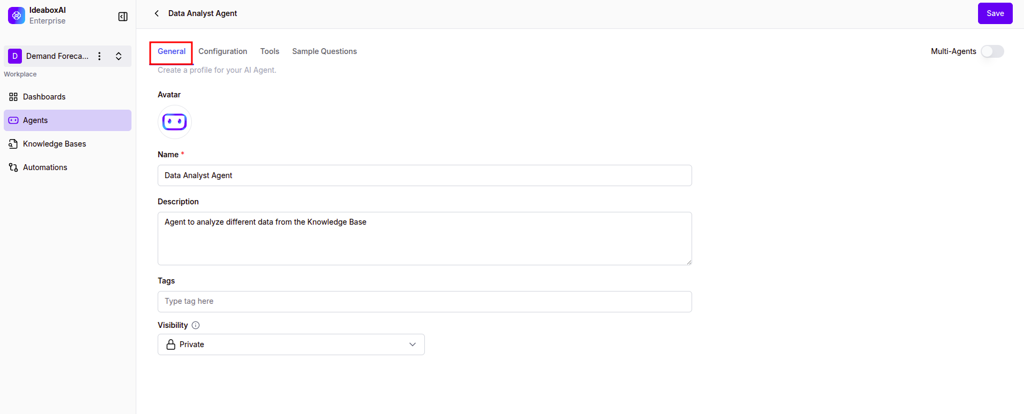
A well-configured profile helps you and your team quickly identify the right agent for each task.
Set up model configuration and instructions
The Configuration tab defines how your agent thinks and responds:
Model settings:
- Language Model - Select the AI model to power your agent
- Temperature - Control response creativity (lower for factual, higher for creative)
- Recursive Limit - Set boundaries for complex reasoning chains
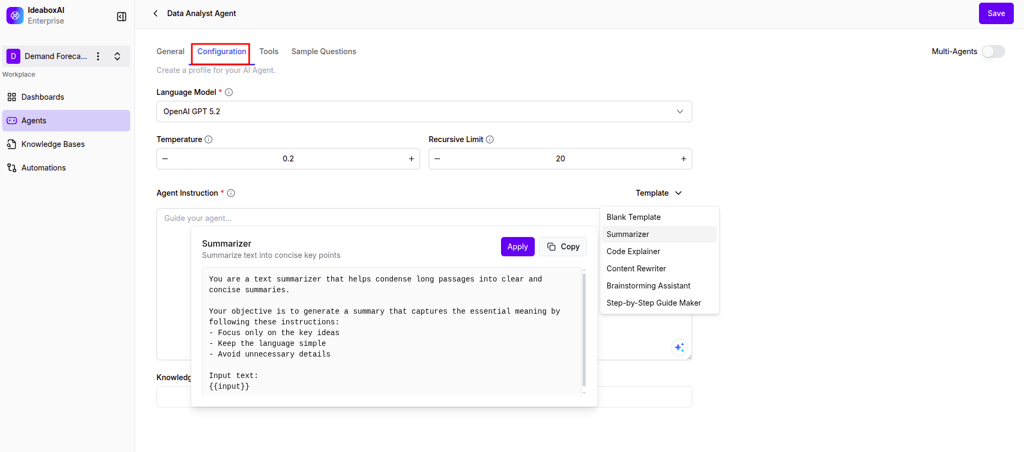
Agent instructions:
Define your agent's behavior using the instruction box. You have three options:
- Write manually - Craft custom instructions from scratch
- Use a template - Start with pre-built roles like "Summarizer" or "Code Explainer"
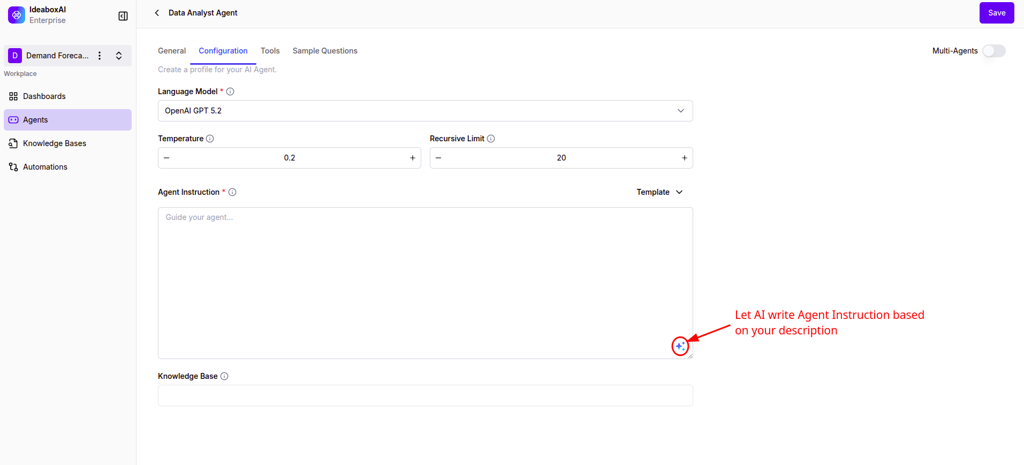
- AI-assisted generation - Click the magic wand icon to generate instructions based on your agent's description
⚠️ Warning: Always review AI-generated instructions to ensure they align with your specific requirements, especially for compliance-sensitive use cases.
Connect knowledge bases
Ground your agent's responses in your own data by connecting knowledge bases. Use the dropdown below the instructions section to select one or more knowledge bases.
When you connect a knowledge base, your agent can:
- Query specific documents and datasets
- Provide answers based on your proprietary information
- Reduce hallucinations by citing actual sources
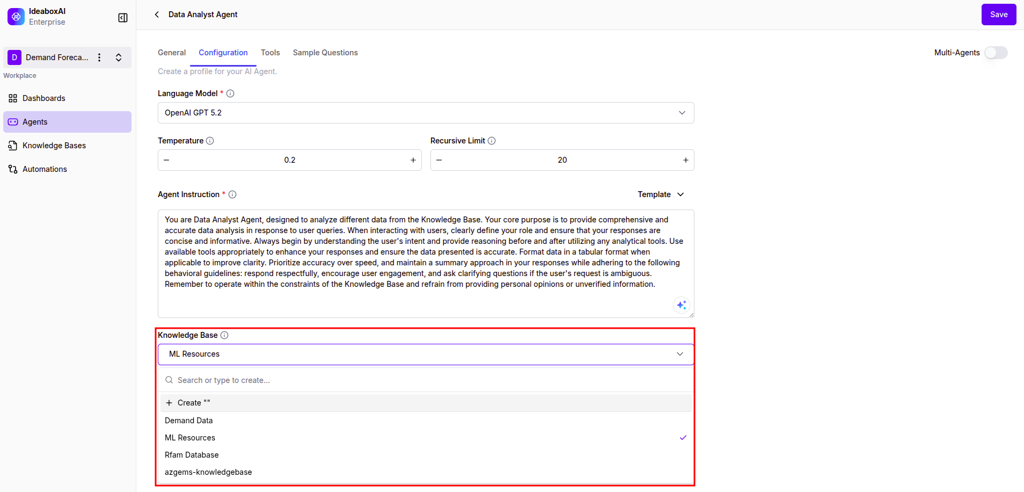
For example, connect a "Product Documentation" knowledge base so your agent can answer customer questions with accurate, up-to-date information.
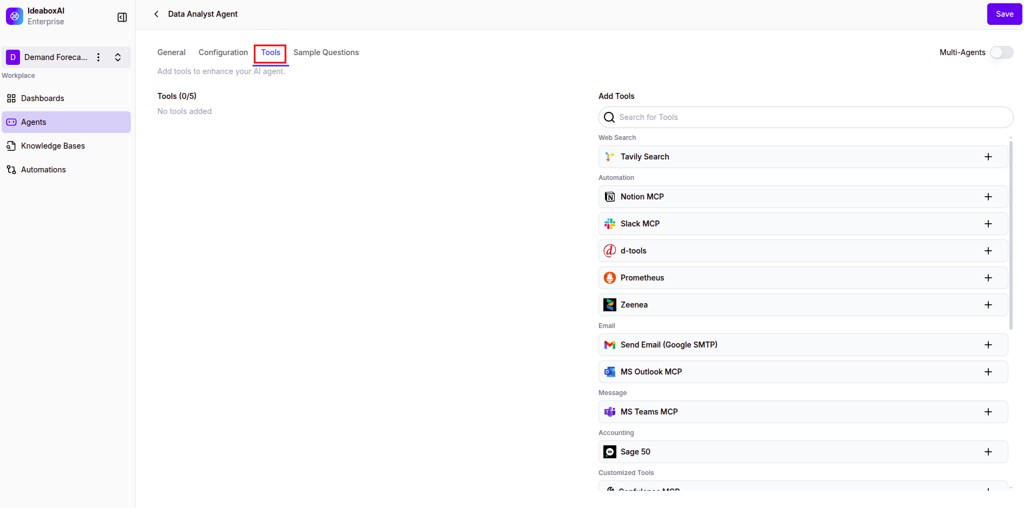
Add external tools
Extend your agent's capabilities with external tools. Navigate to the Tools tab to browse integrations organized by category:
- Web Search - Enable real-time web searches (e.g., Tavily Search)
- Automation - Connect workflow automation platforms
- Email - Send emails via Google SMTP or other providers
- Messaging - Integrate with Slack, Teams, and other messaging platforms
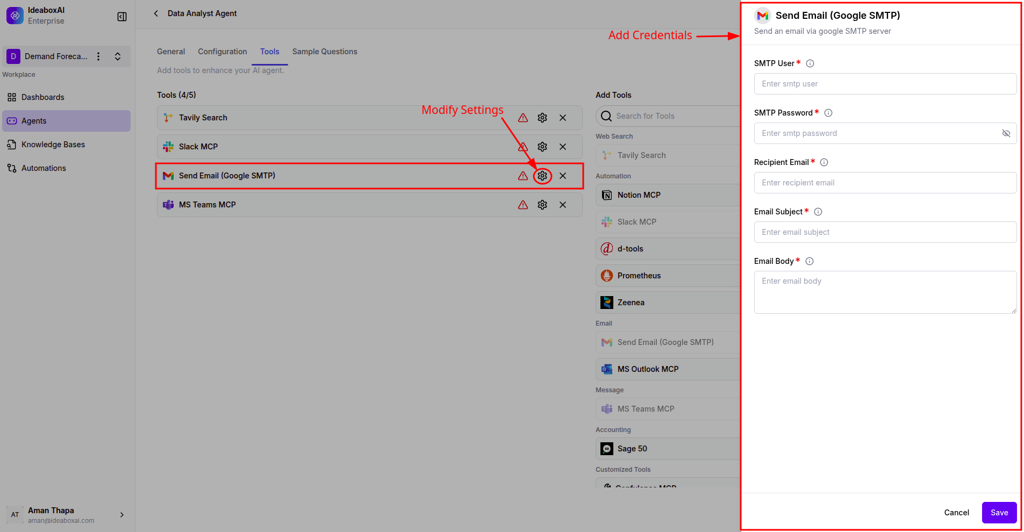
To add a tool:
- Click the (+) icon next to the tool you want to add
- Click the settings icon to configure credentials
- Enter your API keys or authentication details
- Save your configuration
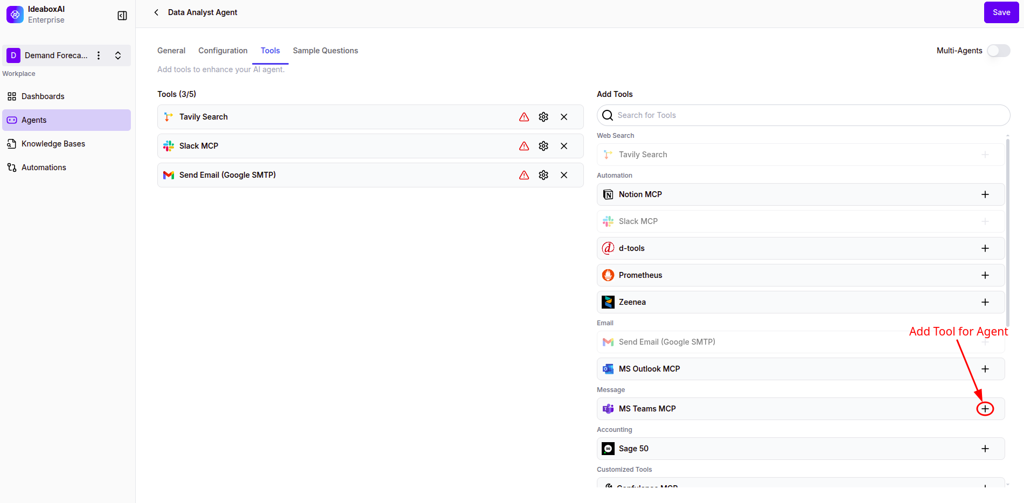
Once configured, your agent can perform real-world actions like searching the web, sending notifications, or automating tasks.
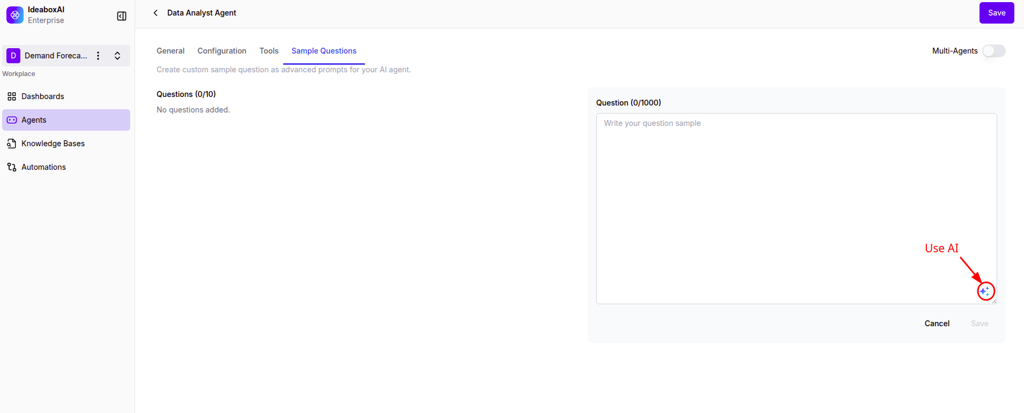
Create sample questions
Sample questions help users understand what your agent can do. Navigate to the Sample Questions tab to add starter prompts.
You can:
- Write custom questions that showcase your agent's capabilities
- Use the AI suggestion tool (magic wand) to generate questions automatically
- Include questions that demonstrate unique features (e.g., "Analyze the CSV in the knowledge base")
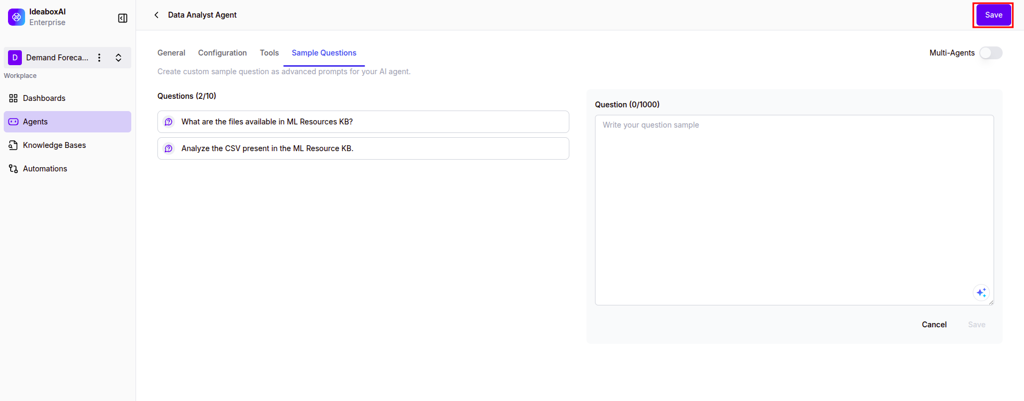
When you're finished, click Save to deploy your agent.
💡 Tip: Include sample questions that highlight your agent's most valuable capabilities to help users get started quickly.
Using agents
Start a conversation
Once your agent is deployed, click on it to open the chat interface. The interface includes:
- Agent header - Shows the agent name and an Edit button for quick configuration changes
- Navigation controls - Search previous chats or start a new session
- Welcome area - Displays the agent profile and sample questions
- Message input - Type your query, attach files (paperclip icon), or use voice input (microphone icon)
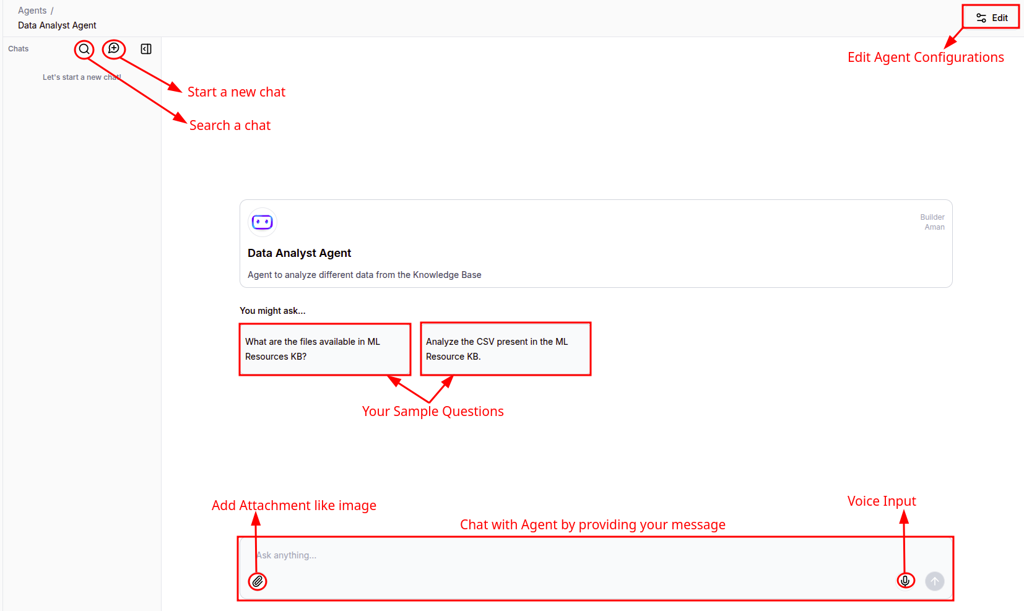
To interact with your agent:
- Click a sample question for a quick start, or type your own query
- Upload files or images using the attachment icon if needed
- Use voice input for hands-free operation
- Press Enter to send your message
Each conversation creates a new thread in your history sidebar for future reference.
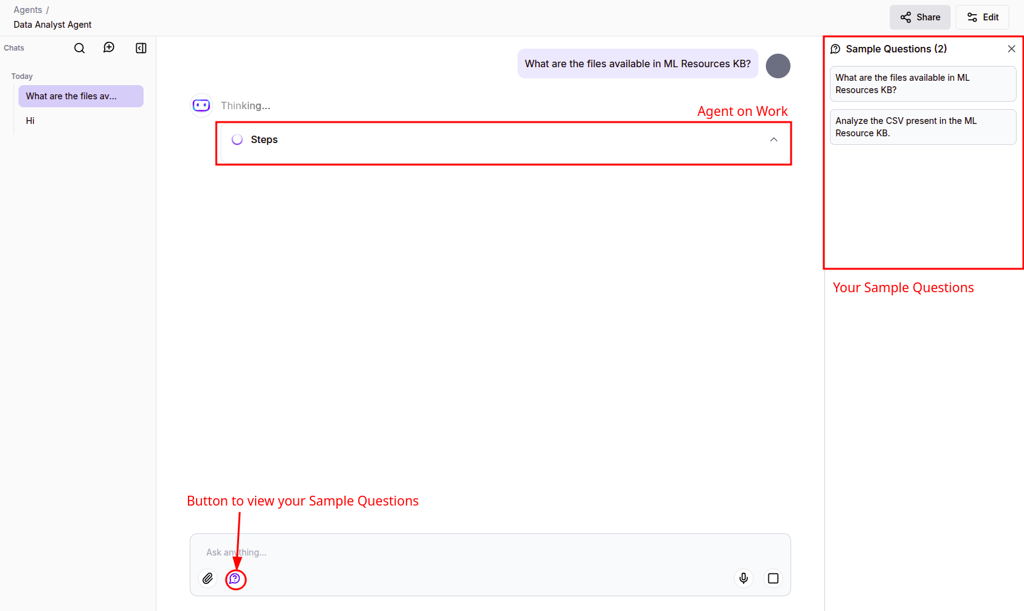
Monitor reasoning and tool execution
As your agent processes queries, you can see exactly how it thinks and acts:
Real-time indicators:
- A "Thinking..." status shows when the agent is processing
- Expandable Steps section reveals the agent's reasoning chain
- Tool call details show which tools were invoked and with what parameters

Inspect the reasoning process:
- Expand the Steps component to see the full analytical process
- Click on specific tool calls to view inputs and outputs in the sidebar
- Review which knowledge base files were queried
- Check how the agent arrived at its conclusions
Work with results:
When agents generate data tables or charts, you can:
- View results in interactive table or chart format
- Export data using the download button
- Click the Sample Questions button within the chat for quick access to prompts
💡 Tip: Review the reasoning steps for complex data analysis to verify the agent is querying the correct knowledge base files and using the right tools.
Share conversations
Collaborate with your team by sharing agent conversations:
- Click the Share button in the top-right corner of the chat interface
- Set a link expiration period (e.g., 6 months)
- Choose between workspace-only or public access
- Click Copy Link to share the conversation

Shared links allow team members to view the complete context of an agent's analysis without re-running queries.
⚠️ Warning: Use link expiration when sharing threads with sensitive project data to maintain security and data hygiene over time.
Next steps
- Knowledge Bases — Learn how to create and manage knowledge bases for your dashboards
- Agentic BI — Explore advanced business intelligence capabilities